Difference between revisions of "HALCON integration"
(Created page with "== 3D Scanning Knowledge Base - Photoneo Wiki == We have created this wiki to share the best practices, tips, tricks and other useful information regarding 3D scanning. == T...") |
|||
| (27 intermediate revisions by 2 users not shown) | |||
| Line 1: | Line 1: | ||
| − | == 3D | + | =About= |
| + | Halcon is a software tool providing a standardized approach to machine vision with an integrated development environment (HDevelop) for building customized image processing solutions. Halcon library contains integration with a large variety of cameras and framegrabbers, including PhoXi 3D Scanners. | ||
| + | To operate PhoXi 3D Scanner from within the Halcon environment it is necessary to: | ||
| + | * Install Halcon | ||
| + | * Install PhoXi Control | ||
| + | * Install PhoXi Halcon Driver compatible with the installed versions of Halcon and PhoXi Control | ||
| − | + | =Documentation= | |
| + | All necessary documentation is available on the following links: | ||
| − | + | Halcon Driver 1.2.14 documentation: | |
| + | :: [https://halcon.photoneo.com/doc/hAcqPhoXi-1.2.14.html @halcon.photoneo.com] | ||
| + | |||
| + | PhoXi Control documentation: | ||
| + | :: [https://www.photoneo.com/files/manuals/PhoXiControl1.2-UserManual.pdf PhoXi Control 1.2 - User Manual] | ||
| − | [ | + | HALCON documentation: |
| + | :: [https://www.mvtec.com/products/halcon/documentation/ @mvtec.com] | ||
| − | + | =Windows 10= | |
| + | == How to use PhoXi 3D scanners through HALCON == | ||
| + | ;1) Download the last version of PhoXi Control and Halcon Driver from the Photoneo website: https://www.photoneo.com/3d-scanning-software/ | ||
| − | [[ | + | ;2) Setting environment variables |
| + | :In Windows, go to Control panel\System and Security\System, then click on Advanced System settings on the left pane, the System properties window will open. Click on environment variables at the bottom of this window. | ||
| + | [[File:env_var.png]] | ||
| + | :In the Environment variables window, in the system variables pane, check if the system variables HALCONARCH, HALCONEXAMPLES, HALCONIMAGES, HALCONROOT are set correctly. (Same as in the picture below) | ||
| + | [[File:env_var3.png]] | ||
| + | :In Ubuntu, edit the file ~\.profile in a text editor and write the following line at the end (without the quotes): | ||
| + | :"source /opt/halcon/.profile_halcon" | ||
| − | + | ;3) Open example file hAcqPhoXi.hdev | |
| + | :located in C:\Users\Public\Documents\PhoHalcon\ with HDevelop. | ||
| − | + | ;4) Launch PhoXiControl (PhoXiControl must be running in order to call API functions) | |
| − | + | ;5) Start our HALCON example (it connects to the last scanner in PhoXiControl) | |
| − | [ | + | ;6) Edit open_framegrabber (AcqName, 1, 1, 0, 0, 0, 0, 'default', -1, 'default', -1, 'false', 'default', 'DeviceValues[0]', -1, -1, AcqHandle) |
| + | :Change 'DeviceValues[0]' to the scanners ID you want to connect to. | ||
| − | + | =Ubuntu 14= | |
| − | + | After the installation, please run following commands to create links to driver libraries: | |
| − | + | $ sudo ln -s /opt/PhoHalcon/libhAcqPhoXi.so /usr/lib/hAcqPhoXi.so | |
| + | $ sudo ln -s /opt/PhoHalcon/libhAcqPhoXixl.so /usr/lib/hAcqPhoXixl.so | ||
| + | $ sudo ln -s /opt/PhoHalcon/libPhoXi_API_gcc4.9.4_Release.so.1.1.6 /usr/lib/libPhoXi_API_gcc4.9.4_Release.so.1.1.6 | ||
| − | == | + | =Upgrading the HALCON driver= |
| − | + | When upgrading the HALCON driver, delete PhoXi_API_msvc12_Release_1.X.X.dll located in the MVTec folder (located in c:\Program Files\MVTec\HALCON-13.0\bin\x64-win64\ by default) | |
| − | |||
| − | |||
| − | |||
| − | |||
| − | |||
| − | |||
| − | |||
| − | |||
| − | |||
Latest revision as of 12:02, 18 February 2020
Contents
About
Halcon is a software tool providing a standardized approach to machine vision with an integrated development environment (HDevelop) for building customized image processing solutions. Halcon library contains integration with a large variety of cameras and framegrabbers, including PhoXi 3D Scanners. To operate PhoXi 3D Scanner from within the Halcon environment it is necessary to:
- Install Halcon
- Install PhoXi Control
- Install PhoXi Halcon Driver compatible with the installed versions of Halcon and PhoXi Control
Documentation
All necessary documentation is available on the following links:
Halcon Driver 1.2.14 documentation:
PhoXi Control documentation:
HALCON documentation:
Windows 10
How to use PhoXi 3D scanners through HALCON
- 1) Download the last version of PhoXi Control and Halcon Driver from the Photoneo website
- https://www.photoneo.com/3d-scanning-software/
- 2) Setting environment variables
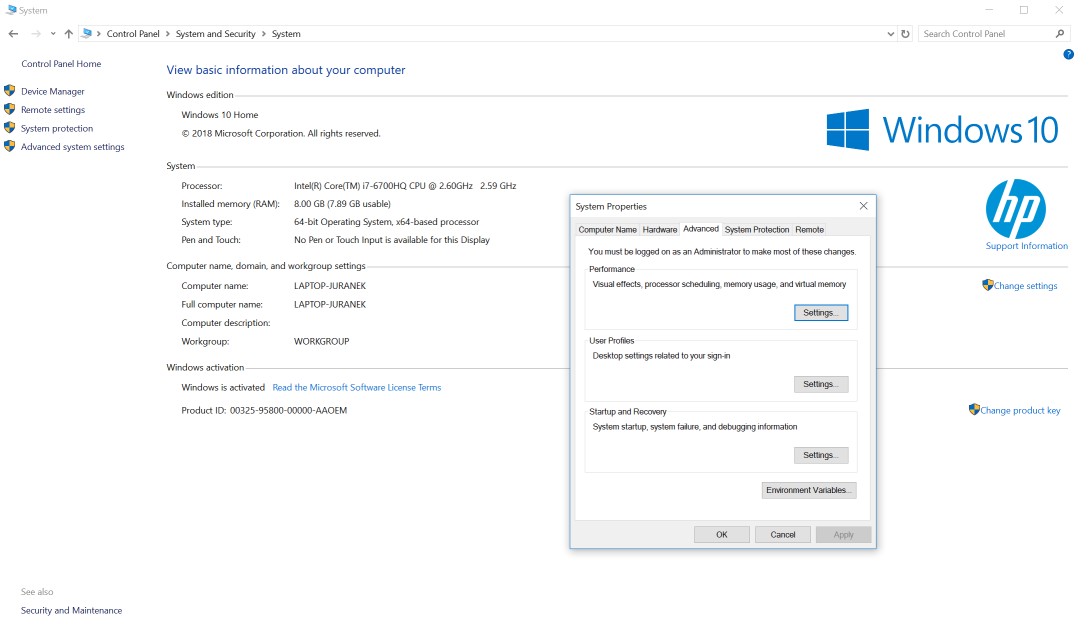
- In Windows, go to Control panel\System and Security\System, then click on Advanced System settings on the left pane, the System properties window will open. Click on environment variables at the bottom of this window.
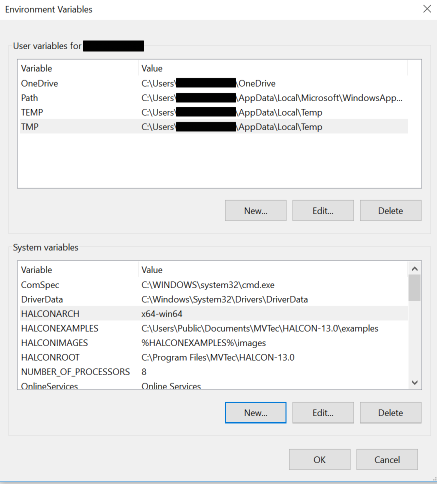
- In the Environment variables window, in the system variables pane, check if the system variables HALCONARCH, HALCONEXAMPLES, HALCONIMAGES, HALCONROOT are set correctly. (Same as in the picture below)
- In Ubuntu, edit the file ~\.profile in a text editor and write the following line at the end (without the quotes):
- "source /opt/halcon/.profile_halcon"
- 3) Open example file hAcqPhoXi.hdev
- located in C:\Users\Public\Documents\PhoHalcon\ with HDevelop.
- 4) Launch PhoXiControl (PhoXiControl must be running in order to call API functions)
- 5) Start our HALCON example (it connects to the last scanner in PhoXiControl)
- 6) Edit open_framegrabber (AcqName, 1, 1, 0, 0, 0, 0, 'default', -1, 'default', -1, 'false', 'default', 'DeviceValues[0]', -1, -1, AcqHandle)
- Change 'DeviceValues[0]' to the scanners ID you want to connect to.
Ubuntu 14
After the installation, please run following commands to create links to driver libraries:
$ sudo ln -s /opt/PhoHalcon/libhAcqPhoXi.so /usr/lib/hAcqPhoXi.so
$ sudo ln -s /opt/PhoHalcon/libhAcqPhoXixl.so /usr/lib/hAcqPhoXixl.so
$ sudo ln -s /opt/PhoHalcon/libPhoXi_API_gcc4.9.4_Release.so.1.1.6 /usr/lib/libPhoXi_API_gcc4.9.4_Release.so.1.1.6
Upgrading the HALCON driver
When upgrading the HALCON driver, delete PhoXi_API_msvc12_Release_1.X.X.dll located in the MVTec folder (located in c:\Program Files\MVTec\HALCON-13.0\bin\x64-win64\ by default)

