Difference between revisions of "Bin Picking Tutorial: Setting up Photoneo Bin Picking Studio with KAWASAKI robots"
| Line 1: | Line 1: | ||
== 1. Prerequisities == | == 1. Prerequisities == | ||
| − | Photoneo KAWASAKI Interface is compatible with E series controllers. | + | Photoneo KAWASAKI Interface is compatible with E series robot controllers. |
== 2. KAWASAKI Controller setup == | == 2. KAWASAKI Controller setup == | ||
| Line 9: | Line 9: | ||
=== 2.1 Network configuration === | === 2.1 Network configuration === | ||
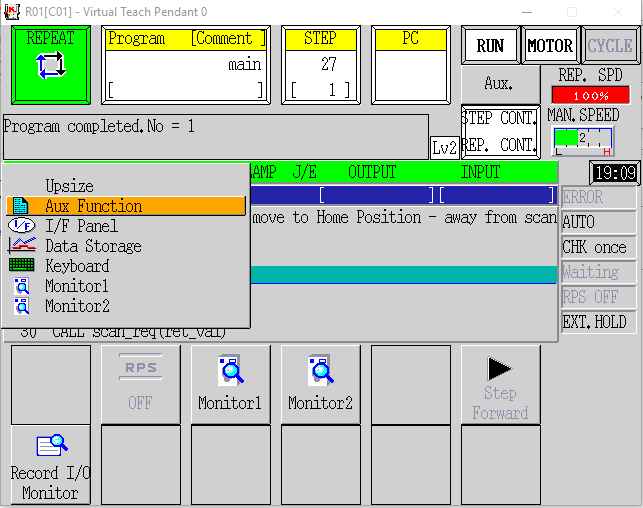
| − | Turn on the | + | Turn on the robot controller, wait for the system to boot, open the '''Menu screen''' and select the '''Aux Function''' option: |
| Line 15: | Line 15: | ||
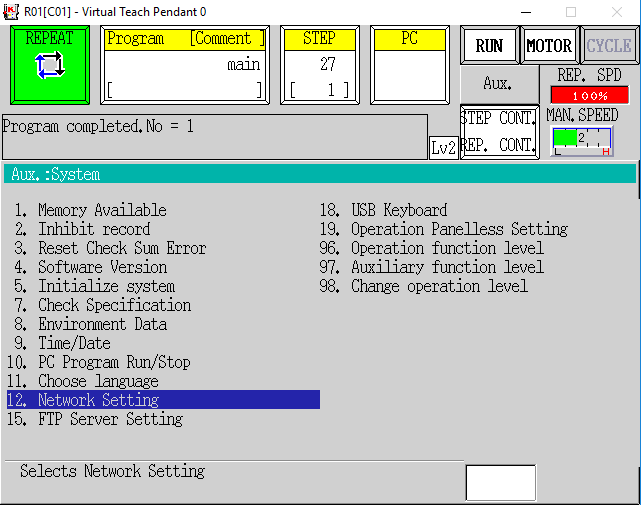
| − | In '''Aux function''' menu select '''System''' | + | In '''Aux function''' menu select '''System''' and '''Network Settings''': |
| − | [[File: Kawa IP step | + | [[File: Kawa IP step 2.png]] |
| − | |||
| − | |||
| − | |||
| − | |||
| − | |||
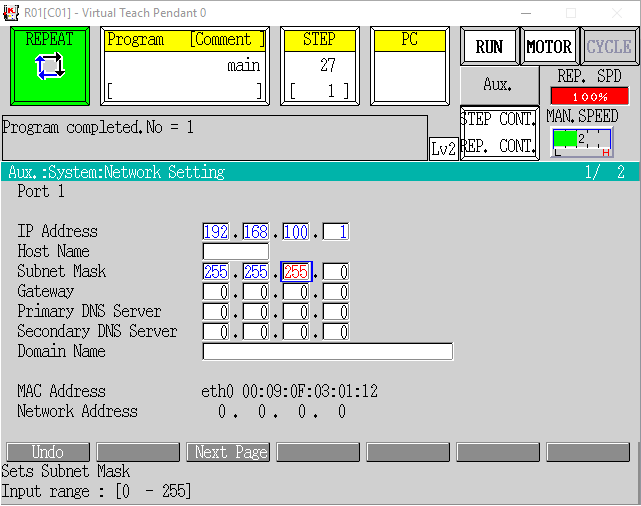
| + | E-series robot controllers have two Ethernet ports. We will use '''Port 1''' for communication with '''Photoneo Binpicking Studio''', while '''Port 2''' will be utilized for transferring programs between PC and Robot controller using '''KRTerm'''. | ||
| − | Configure | + | Configure Port 1 to meet your network requirements and make sure that both robot controller and vision controller running Photoneo Binpicking Studio will be on the same subnet. |
| Line 33: | Line 29: | ||
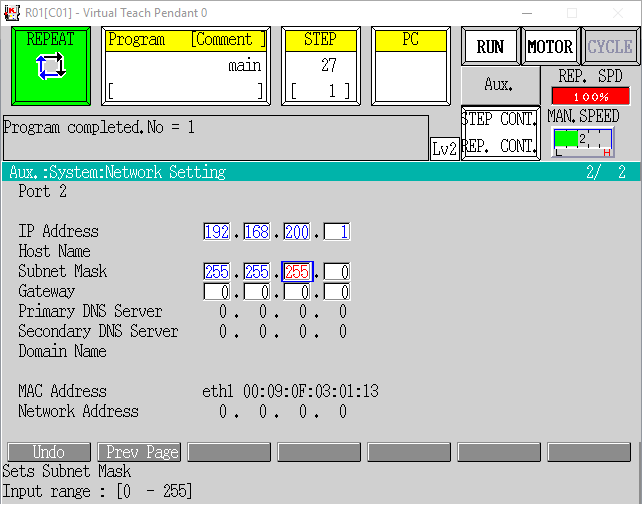
| − | + | Configure '''Port 2''' for transferring programs between PC and robot controller. Click '''Next Page''', configure network settings and confirm by clicking '''Enter''' button. | |
| Line 41: | Line 37: | ||
=== 2.2 Enable Autostart === | === 2.2 Enable Autostart === | ||
| − | Photoneo KAWASAKI interface consists of two tasks - '''Binpicking Client''' task and '''State server'''. While Binpicking Client is | + | Photoneo KAWASAKI interface consists of two tasks - '''Binpicking Client''' task and '''State server'''. While Binpicking Client is '''Cycle Started''' as a normal robotic program, State server runs in the background from boot. |
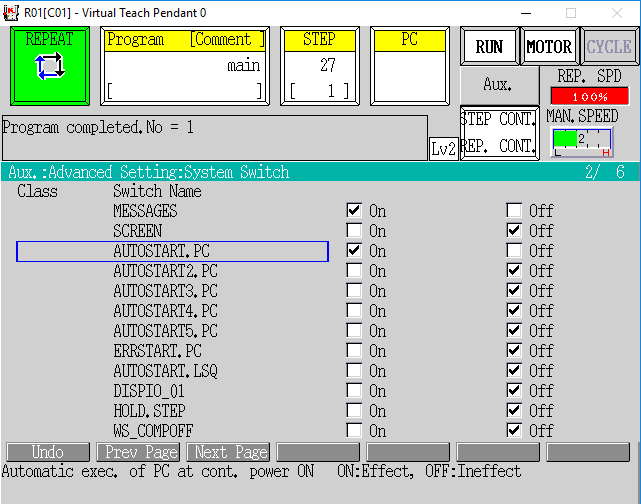
| − | In order to enable State server to run from the first boot, it is necessary to enable '''AUTOSTART.PC''' system switch. | + | In order to enable State server to run from the first boot properly, it is necessary to enable '''AUTOSTART.PC''' system switch. |
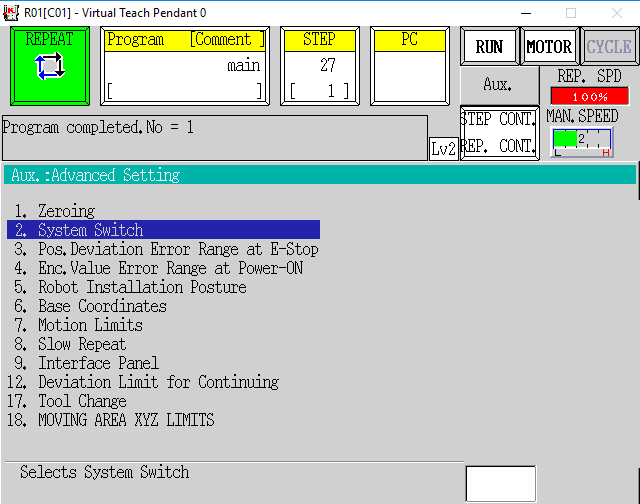
| − | On pendant click '''Menu''' -> '''Advanced Settings''' | + | On pendant click '''Menu''' -> '''Advanced Settings''' -> '''System Switch''' |
| − | |||
| − | |||
| − | |||
| − | |||
| − | |||
| − | |||
| Line 57: | Line 47: | ||
| − | You should see | + | You should see list of system switches. '''AUTOSTART.PC''' switches are available on the second page so click '''Next Page''' to access them. Turning AUTOSTART.PC '''ON''' enables State Server to start properly even on the first boot |
| Line 63: | Line 53: | ||
| − | Restart robot controller to apply network settings. | + | Restart robot controller to apply network and autostart settings. |
== 3. KRTerm == | == 3. KRTerm == | ||
| Line 74: | Line 64: | ||
- '''main_application.pg''' | - '''main_application.pg''' | ||
| + | |||
| + | These three files includes approximately 25 programs which compose the Photoneo Kawasaki Interface. All these files need to be transferred to the robot controller to get interface up and running. | ||
=== 3.1 Transfering .pg files to robot controller === | === 3.1 Transfering .pg files to robot controller === | ||
| − | + | You should receive .pg files as an .zip archive together with Photoneo Binpicking Studio. You can copy the .pg files to robot controller directly from the USB stick using Pendant, however the most convenient method is to use the [http://ftp.kawasakirobot.de/files/public/Software/KRTerm/ KRTerm] tool. | |
| − | |||
| − | You can copy the files directly from the USB stick using | ||
Make sure that Port 2 is configured for communication with your PC and they are connected to the same subnet. | Make sure that Port 2 is configured for communication with your PC and they are connected to the same subnet. | ||
| Line 95: | Line 85: | ||
| − | Click '''File''' -> '''Set Current Folder''' and set path to the folder where you | + | Click '''File''' -> '''Set Current Folder''' and set path to the folder where you store .pg files |
| Line 107: | Line 97: | ||
| − | Use password '''as''' to log in. Now your are able to issue commands directly to robot controller. In order to load .pg files to robot controller | + | Use password '''as''' to log in. Now your are able to issue commands directly to robot controller. In order to load .pg files to robot controller type '''LOAD''' command as shown in the figure below: |
| Line 132: | Line 122: | ||
The following API describes the functionality of requests provided by Photoneo KAWASAKI Interface. These requests are intended for high level control of bin picking sequences and are usually called in '''main_application.pg''' | The following API describes the functionality of requests provided by Photoneo KAWASAKI Interface. These requests are intended for high level control of bin picking sequences and are usually called in '''main_application.pg''' | ||
| − | + | -------------------------------------------------------- | |
- '''connect_to_vc(.ret_val_conn)''' - function to establish a connection to the Vision Controller. Blocking function; suspends the program until a proper connection is established. | - '''connect_to_vc(.ret_val_conn)''' - function to establish a connection to the Vision Controller. Blocking function; suspends the program until a proper connection is established. | ||
| Line 151: | Line 141: | ||
- '''calib_reset_req(.ret_val_reset)''' - request to reset current calibration and remove all previously added points | - '''calib_reset_req(.ret_val_reset)''' - request to reset current calibration and remove all previously added points | ||
| − | - '''pick_part()''' - | + | |
| + | === 4.2 AS CONFIG === | ||
| + | |||
| + | '''customer_definitions.pg''' enables the user to configure several bin picking settings, including gripper command implementations, trajectory speed and precision adjustments. | ||
| + | -------------------------------------------------------- | ||
| + | - '''pick_part()''' - standard bin picking sequence. This flexible, operation-based implementation allows performing bin picking sequences, which consist of various numbers of operations to be performed. '''Do not edit !!!''' | ||
| + | |||
| + | - '''place_part()''' - placing operation. Adapt placing sequence and poses to meet your application requirements. | ||
| + | |||
| + | - '''grip_attach()''' - implement function for opening your gripper here | ||
| + | |||
| + | - '''grip_deattach()''' - implement function for closing your gripper here | ||
| + | |||
| + | - '''gripper_user_1()''' - implement custom user gripper command (reserved for future use) | ||
| + | |||
| + | - '''gripper_user_2()''' - implement custom user gripper command (reserved for future use) | ||
| + | |||
| + | - '''gripper_user_3()''' - implement custom user gripper command (reserved for future use) | ||
| + | |||
| + | - '''gripper_user_4()''' - implement custom user gripper command (reserved for future use) | ||
| + | |||
| + | - '''gripper_user_5()''' - implement custom user gripper command (reserved for future use) | ||
| + | |||
| + | - '''gripper_user_6()''' - implement custom user gripper command (reserved for future use) | ||
| + | |||
| + | - '''binpicking_settings()''' - specify speed and precision settings for bin picking trajectories. Adopt the suitable number of trajectories to meet your bin picking setup. (the default setting is 4 trajectories) | ||
| + | |||
| + | |||
| + | === 4.3 AS ERROR HANDLING === | ||
| + | |||
| + | Photoneo KAWASAKI interface provides basic error handling. If an error occurs during bin picking operations, error code is returned to '''main_application''' via '''ret_val''' variable. | ||
| + | |||
| + | Following is the list of potential binpicking error codes: | ||
| + | |||
| + | '''OK := 0''' - Service response from Vision Controller is valid | ||
| + | |||
| + | '''SERVICE_ERR := 1''' - Service response from Vision Controller is invalid. | ||
| + | |||
| + | '''UNKNOWN_REQ := 2''' - The Vision Controller received an unknown request. | ||
| + | |||
| + | '''COMM_FAILURE := 3''' - Communication failure due to socket closure. | ||
| + | |||
| + | '''BAD_DATA := 4''' - Data validation check has failed. | ||
| + | |||
| + | '''TIMEOUT := 5''' - Communication failure due to socket timeout. | ||
| + | |||
| + | '''PLANNING_FAILED := 201''' - Trajectory planning has failed | ||
| + | |||
| + | '''NO_PART_FOUND := 202''' - No part has been localized | ||
| + | |||
| + | '''NOT_INIT := 203''' - Bin picking application has not been properly initialized on Vision Controller | ||
| + | |||
| + | '''UNKNOWN_ERR := 299''' - Unspecified internal error | ||
| + | |||
| + | The '''main_application.pg''' already includes basic error_handling which is implemented through '''labels''' and '''GOTO''' commands, but it can be adapted to more complex scenarios if needed. | ||
| + | |||
| + | |||
| + | === 4.4 MAIN APPLICATION === | ||
| + | |||
| + | ; Copyright (c) 2018 Photoneo s.r.o. | ||
| + | ; All rights reserved | ||
| + | ; Description: Photoneo Kawasaki Module v.1.2.0 Main Application | ||
| + | ;//------------------------------------------------------------------------- | ||
| + | .PROGRAM main() | ||
| + | |||
| + | ;// Enable State Server to start on boot | ||
| + | AUTOSTART.PC ON | ||
| + | |||
| + | ;// Changing Base Frame to pho_base - see customer definitions for more details | ||
| + | BASE pho_base | ||
| + | |||
| + | ;// Adopt Network settings to your meet your configuration | ||
| + | BP_PORT = 11003 | ||
| + | VC_IP[1] = 192 | ||
| + | VC_IP[2] = 168 | ||
| + | VC_IP[3] = 100 | ||
| + | VC_IP[4] = 12 | ||
| + | |||
| + | ;// Connect to Vision Controller | ||
| + | CALL connect_to_vc(ret_val) | ||
| + | IF ret_val == COMM_FAILURE THEN | ||
| + | GOTO quit | ||
| + | END | ||
| + | reinit: | ||
| + | ;// Initialize binpicking | ||
| + | CALL init_req(ret_val) | ||
| + | IF ret_val <> OK THEN | ||
| + | GOTO quit | ||
| + | END | ||
| + | |||
| + | ;// Deattach gripper and move to Home Position - away from scanning area | ||
| + | CALL grip_deattach | ||
| + | SPEED 10 ALWAYS | ||
| + | JMOVE #pho_home | ||
| + | BREAK | ||
| + | |||
| + | ;// Request first scan | ||
| + | CALL scan_req(ret_val) | ||
| + | IF ret_val == COMM_FAILURE THEN | ||
| + | GOTO quit | ||
| + | END | ||
| + | |||
| + | ;// Initial wait | ||
| + | TWAIT 10 | ||
| + | |||
| + | ;// MAIN LOOP | ||
| + | WHILE (TRUE) DO | ||
| + | main_start: | ||
| + | ;// Wait for scan completition | ||
| + | CALL wait_for_scan(ret_val) | ||
| + | |||
| + | ;// Check COMM_FAILURE error | ||
| + | IF (ret_val == COMM_FAILURE) THEN | ||
| + | GOTO quit | ||
| + | END | ||
| + | |||
| + | ;// Check NOT_INIT or SERVICE_ERR state | ||
| + | IF (ret_val == NOT_INIT) OR (ret_val == SERVICE_ERR) THEN | ||
| + | GOTO reinit | ||
| + | END | ||
| + | |||
| + | ;// SCAN was received successfully | ||
| + | IF (ret_val == OK) THEN | ||
| + | |||
| + | ;// Request trajectory | ||
| + | CALL traj_req(ret_val) | ||
| + | IF ret_val == COMM_FAILURE THEN | ||
| + | GOTO quit | ||
| + | END | ||
| + | |||
| + | ;// Receive trajectory | ||
| + | CALL traj_recv(ret_val) | ||
| + | |||
| + | ;// Check COMM_FAILURE error | ||
| + | IF ret_val == COMM_FAILURE THEN | ||
| + | GOTO quit | ||
| + | END | ||
| + | |||
| + | ;// Check NOT_INIT or SERVICE_ERR state | ||
| + | IF (ret_val == NOT_INIT) OR (ret_val == SERVICE_ERR) THEN | ||
| + | GOTO reinit | ||
| + | END | ||
| + | |||
| + | ;// Check PLANNING FAILED or NO_PART_FOUND state | ||
| + | IF (ret_val == PLANNING_FAILED) OR (ret_val == NO_PART_FOUND) THEN | ||
| + | |||
| + | ;// Move back to home position | ||
| + | JMOVE #pho_home | ||
| + | BREAK | ||
| + | |||
| + | ;// Request new scan | ||
| + | CALL scan_req(ret_val) | ||
| + | IF ret_val == COMM_FAILURE THEN | ||
| + | GOTO quit | ||
| + | END | ||
| + | |||
| + | GOTO main_start | ||
| + | END | ||
| + | |||
| + | ;// TRAJECTORY was calculated successfully | ||
| + | IF (ret_val == OK) THEN | ||
| + | |||
| + | ;// Move robot to binpicking start position | ||
| + | JMOVE #pho_start | ||
| + | |||
| + | ;// Pick part and wait for movement completition | ||
| + | CALL pick_part | ||
| + | BREAK | ||
| + | |||
| + | ;// Trig new scan | ||
| + | CALL scan_req(ret_val) | ||
| + | IF ret_val == COMM_FAILURE THEN | ||
| + | GOTO quit | ||
| + | END | ||
| + | |||
| + | ;// Place part | ||
| + | CALL place_part | ||
| + | END | ||
| + | END | ||
| + | END | ||
| + | ;//End of MAIN LOOP | ||
| + | |||
| + | quit: | ||
| + | CALL close_socket | ||
| + | .END | ||
Revision as of 15:59, 1 June 2018
Contents
1. Prerequisities
Photoneo KAWASAKI Interface is compatible with E series robot controllers.
2. KAWASAKI Controller setup
The following tutorial gives a step by step guide of how to configure your KAWASAKI E-series controller and install all necessary .pg files you will need to get the robot interface for Photoneo Binpicking Studio up and running.
2.1 Network configuration
Turn on the robot controller, wait for the system to boot, open the Menu screen and select the Aux Function option:
In Aux function menu select System and Network Settings:
E-series robot controllers have two Ethernet ports. We will use Port 1 for communication with Photoneo Binpicking Studio, while Port 2 will be utilized for transferring programs between PC and Robot controller using KRTerm.
Configure Port 1 to meet your network requirements and make sure that both robot controller and vision controller running Photoneo Binpicking Studio will be on the same subnet.
Configure Port 2 for transferring programs between PC and robot controller. Click Next Page, configure network settings and confirm by clicking Enter button.
2.2 Enable Autostart
Photoneo KAWASAKI interface consists of two tasks - Binpicking Client task and State server. While Binpicking Client is Cycle Started as a normal robotic program, State server runs in the background from boot.
In order to enable State server to run from the first boot properly, it is necessary to enable AUTOSTART.PC system switch.
On pendant click Menu -> Advanced Settings -> System Switch
You should see list of system switches. AUTOSTART.PC switches are available on the second page so click Next Page to access them. Turning AUTOSTART.PC ON enables State Server to start properly even on the first boot
Restart robot controller to apply network and autostart settings.
3. KRTerm
Photoneo KAWASAKI interface consists of three .pg files
- photoneo_common.pg
- customer_definitions.pg
- main_application.pg
These three files includes approximately 25 programs which compose the Photoneo Kawasaki Interface. All these files need to be transferred to the robot controller to get interface up and running.
3.1 Transfering .pg files to robot controller
You should receive .pg files as an .zip archive together with Photoneo Binpicking Studio. You can copy the .pg files to robot controller directly from the USB stick using Pendant, however the most convenient method is to use the KRTerm tool.
Make sure that Port 2 is configured for communication with your PC and they are connected to the same subnet.
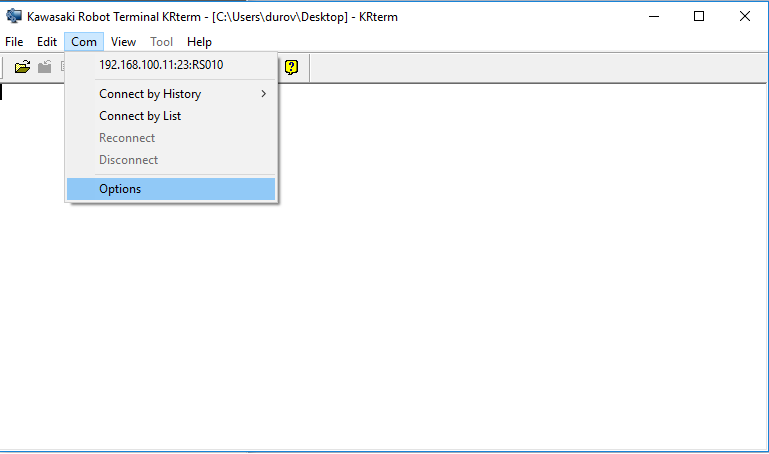
Open KRTerm and select COM -> Options to add new robot controller:
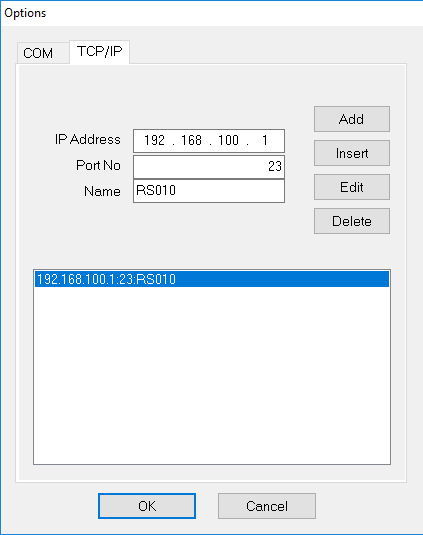
Type IP address of Port 2 as configured in the pendant in previous step:
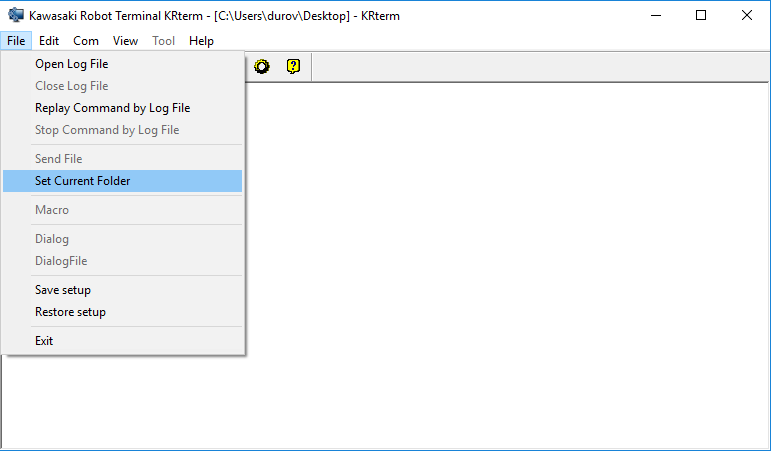
Click File -> Set Current Folder and set path to the folder where you store .pg files
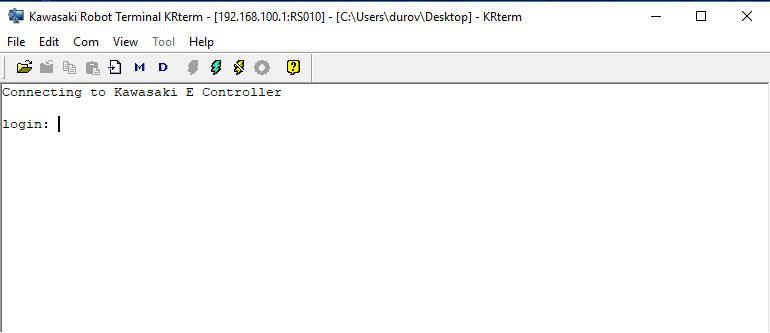
We are now ready to connect to the robot. Make sure that you are able to ping robot controller from your PC and click on Connect button. If connection was established properly you should see login prompt as shown in the figure below:
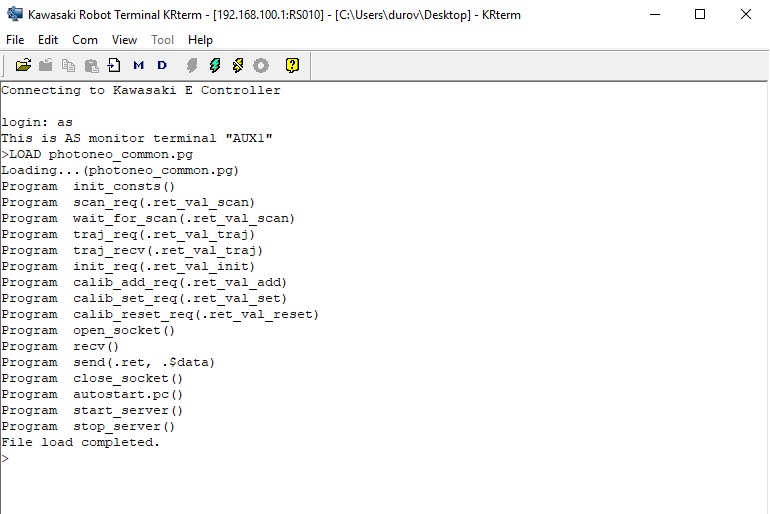
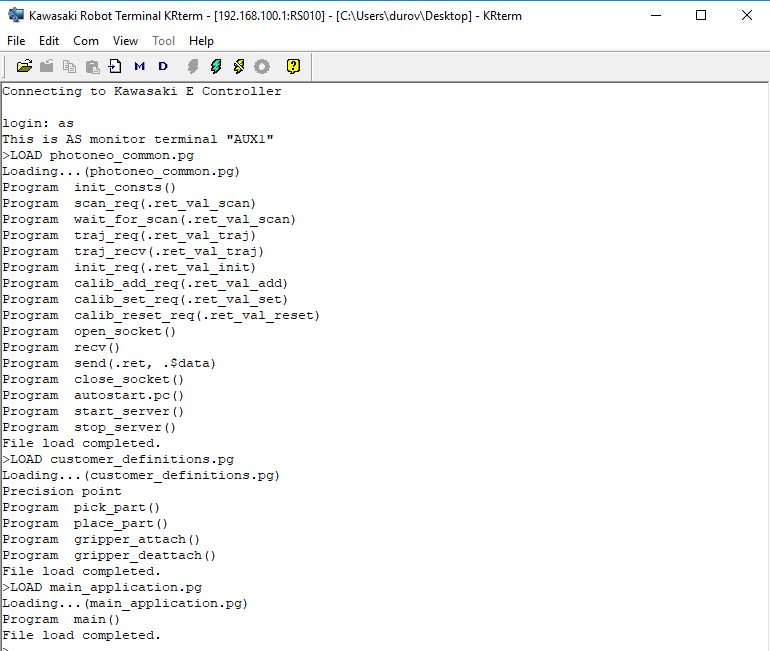
Use password as to log in. Now your are able to issue commands directly to robot controller. In order to load .pg files to robot controller type LOAD command as shown in the figure below:
Use LOAD command to upload all three .pg files of Photoneo KAWASAKI interface.
At this point your Robot Controller is configured to work with Photoneo Binpicking Studio. However your AS code must be adopted to meet your application requirements - you need to reteach HOME, START and END poses, update part placing, application logic, etc. The following section of the tutorial provides basic examples of how this can be programmed as well as a detailed explanation of Photoneo AS API.
4. AS Language
Photoneo KAWASAKI interface was designed to be easily integrated into existing application written in AS code. It provides two means which influence the final robot behavior:
- AS API - set of AS requests (or procedures) used to control the bin picking sequence. Requests are defined in photoneo_common.pg module and used within main_application.pg
- AS CONFIG - customer_definitions.pg holds an application specific settings such as gripper commands, motion execution settings and object placing definitions.
4.1 AS API
The following API describes the functionality of requests provided by Photoneo KAWASAKI Interface. These requests are intended for high level control of bin picking sequences and are usually called in main_application.pg
- connect_to_vc(.ret_val_conn) - function to establish a connection to the Vision Controller. Blocking function; suspends the program until a proper connection is established.
- scan_req(.ret_val_scan) - request to trigger the next scan and localization. Non-blocking request; the AS program continues immediately at the next line.
- wait_for_scan(.ret_val_wait) - function to wait for scan to be finished. This should be called after triggering the scan, but not immediately
- traj_req(.ret_val_traj) - request to start trajectory planning for current goal. Non-blocking function; the AS program continues immediately at the next line.
- traj_recv(.ret_val_traj) - function to receive requested bin picking trajectories (consisting of a sequence of trajectory and gripper operations). This is usually called inside pho_bin_picking() function by default. Blocking function; waits for motion data to be received.
- init_req(.ret_val_init) - request to initialize bin picking application from the Vision Controller side. Start and End Poses defined by the operator from the AS side are transferred to the Vision Controller and used in the trajectory planning pipeline as start and terminus points.
- calib_add_req(.ret_val_add) - request to add calibration point - a scan is triggered and the calibration is recalculated. Blocking request; the program will not continue until the calibration result is recalculated and has been received by the Robot Controller.
- calib_set_req(.ret_val_set) - request to set current calibration result to the PhoXi Scanner
- calib_reset_req(.ret_val_reset) - request to reset current calibration and remove all previously added points
4.2 AS CONFIG
customer_definitions.pg enables the user to configure several bin picking settings, including gripper command implementations, trajectory speed and precision adjustments.
- pick_part() - standard bin picking sequence. This flexible, operation-based implementation allows performing bin picking sequences, which consist of various numbers of operations to be performed. Do not edit !!!
- place_part() - placing operation. Adapt placing sequence and poses to meet your application requirements.
- grip_attach() - implement function for opening your gripper here
- grip_deattach() - implement function for closing your gripper here
- gripper_user_1() - implement custom user gripper command (reserved for future use)
- gripper_user_2() - implement custom user gripper command (reserved for future use)
- gripper_user_3() - implement custom user gripper command (reserved for future use)
- gripper_user_4() - implement custom user gripper command (reserved for future use)
- gripper_user_5() - implement custom user gripper command (reserved for future use)
- gripper_user_6() - implement custom user gripper command (reserved for future use)
- binpicking_settings() - specify speed and precision settings for bin picking trajectories. Adopt the suitable number of trajectories to meet your bin picking setup. (the default setting is 4 trajectories)
4.3 AS ERROR HANDLING
Photoneo KAWASAKI interface provides basic error handling. If an error occurs during bin picking operations, error code is returned to main_application via ret_val variable.
Following is the list of potential binpicking error codes:
OK := 0 - Service response from Vision Controller is valid
SERVICE_ERR := 1 - Service response from Vision Controller is invalid.
UNKNOWN_REQ := 2 - The Vision Controller received an unknown request.
COMM_FAILURE := 3 - Communication failure due to socket closure.
BAD_DATA := 4 - Data validation check has failed.
TIMEOUT := 5 - Communication failure due to socket timeout.
PLANNING_FAILED := 201 - Trajectory planning has failed
NO_PART_FOUND := 202 - No part has been localized
NOT_INIT := 203 - Bin picking application has not been properly initialized on Vision Controller
UNKNOWN_ERR := 299 - Unspecified internal error
The main_application.pg already includes basic error_handling which is implemented through labels and GOTO commands, but it can be adapted to more complex scenarios if needed.
4.4 MAIN APPLICATION
    ; Copyright (c) 2018 Photoneo s.r.o.
    ; All rights reserved
    ; Description: Photoneo Kawasaki Module v.1.2.0 Main Application
    ;//-------------------------------------------------------------------------
    .PROGRAM main()

      ;// Enable State Server to start on boot
      AUTOSTART.PC ON

      ;// Changing Base Frame to pho_base - see customer definitions for more details
      BASE pho_base

      ;// Adopt Network settings to your meet your configuration
      BP_PORT = 11003
      VC_IP[1] = 192
      VC_IP[2] = 168
      VC_IP[3] = 100
      VC_IP[4] = 12

      ;// Connect to Vision Controller
      CALL connect_to_vc(ret_val)
      IF ret_val == COMM_FAILURE THEN
        GOTO quit
      END
 reinit:
     ;// Initialize binpicking
     CALL init_req(ret_val)
     IF ret_val <> OK THEN
       GOTO quit
     END

     ;// Deattach gripper and move to Home Position - away from scanning area
     CALL grip_deattach
     SPEED 10 ALWAYS
     JMOVE #pho_home
     BREAK

     ;// Request first scan
     CALL scan_req(ret_val)
     IF ret_val == COMM_FAILURE THEN
       GOTO quit
     END

     ;// Initial wait
     TWAIT 10

     ;// MAIN LOOP
     WHILE (TRUE) DO
 main_start:
       ;// Wait for scan completition
       CALL wait_for_scan(ret_val)

       ;// Check COMM_FAILURE error
       IF (ret_val == COMM_FAILURE) THEN
         GOTO quit
       END

       ;// Check NOT_INIT or SERVICE_ERR state
       IF (ret_val == NOT_INIT) OR (ret_val == SERVICE_ERR) THEN
         GOTO reinit
       END

       ;// SCAN was received successfully
       IF (ret_val == OK) THEN

         ;// Request trajectory
         CALL traj_req(ret_val)
         IF ret_val == COMM_FAILURE THEN
           GOTO quit
         END

         ;// Receive trajectory
         CALL traj_recv(ret_val)

         ;// Check COMM_FAILURE error
         IF ret_val == COMM_FAILURE THEN
           GOTO quit
         END

         ;// Check NOT_INIT or SERVICE_ERR state
         IF (ret_val == NOT_INIT) OR (ret_val == SERVICE_ERR) THEN
           GOTO reinit
         END

         ;// Check PLANNING FAILED or NO_PART_FOUND state
         IF (ret_val == PLANNING_FAILED) OR (ret_val == NO_PART_FOUND) THEN

           ;// Move back to home position
 	    JMOVE #pho_home
           BREAK

 	    ;// Request new scan
           CALL scan_req(ret_val)
           IF ret_val == COMM_FAILURE THEN
             GOTO quit
           END

 	    GOTO main_start
         END

         ;// TRAJECTORY was calculated successfully
         IF (ret_val == OK) THEN

           ;// Move robot to binpicking start position
           JMOVE #pho_start

           ;// Pick part and wait for movement completition
           CALL pick_part
           BREAK

           ;// Trig new scan
           CALL scan_req(ret_val)
           IF ret_val == COMM_FAILURE THEN
             GOTO quit
           END

           ;// Place part
           CALL place_part
         END
       END
     END
     ;//End of MAIN LOOP

   quit:
     CALL close_socket
   .END
