Difference between revisions of "Bin Picking Tutorial: Setting up Photoneo Bin Picking Studio with FANUC robots"
| Line 1: | Line 1: | ||
== 1. Prerequisites == | == 1. Prerequisites == | ||
| − | + | Prior to setup please ensure that your Fanuc controller meets the following criteria: | |
- '''System version 8.10 and higher''' (Versions 6.40 - 7.70 are also supported with certain limitations) | - '''System version 8.10 and higher''' (Versions 6.40 - 7.70 are also supported with certain limitations) | ||
| Line 9: | Line 9: | ||
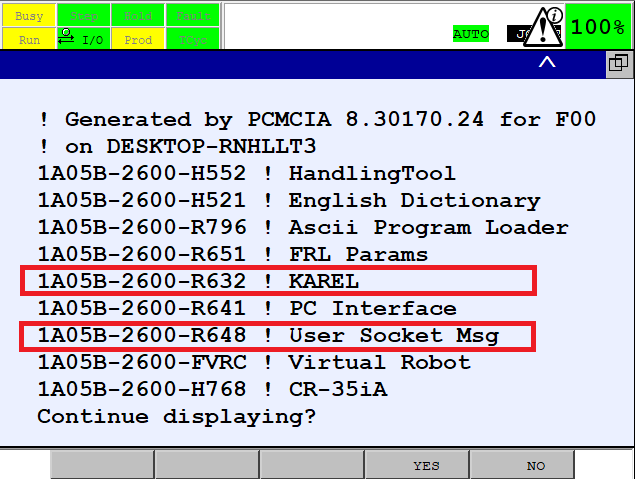
- '''R648 User Socket Msg''' - Socket Communication option available | - '''R648 User Socket Msg''' - Socket Communication option available | ||
| − | Click '''Menu''' -> '''Next''' -> '''Status''' -> '''Version ID''' -> '''Next''' -> '''F3[ORDER FI]''' to verify that required options are installed on your robot controller (see figure below): | + | Click '''Menu''' -> '''Next''' -> '''Status''' -> '''Version ID''' -> '''Next''' -> '''F3[ORDER FI]''' to verify that the required options are installed on your robot controller (see figure below): |
| Line 18: | Line 18: | ||
=== 2.1 Set IP Addresses of Ethernet Ports === | === 2.1 Set IP Addresses of Ethernet Ports === | ||
| − | + | The first step of the process is to configure the IP addresses of the robot controller. | |
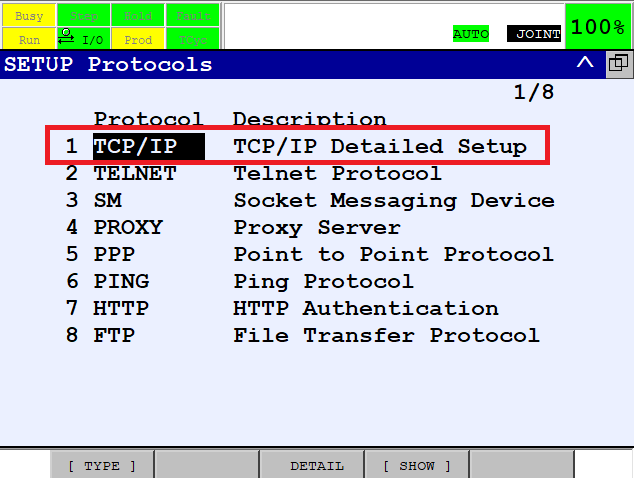
| − | + | Using Teach Pendant, press '''Menu''' -> '''Setup''' -> '''Host Comm''' -> '''TCP/IP''' -> '''F3[Detail]''': | |
| Line 26: | Line 26: | ||
| − | Two Ethernet ports should be available | + | Two Ethernet ports should be available; users are recommended to configure '''Port#1''' for communication with Vision Controller. |
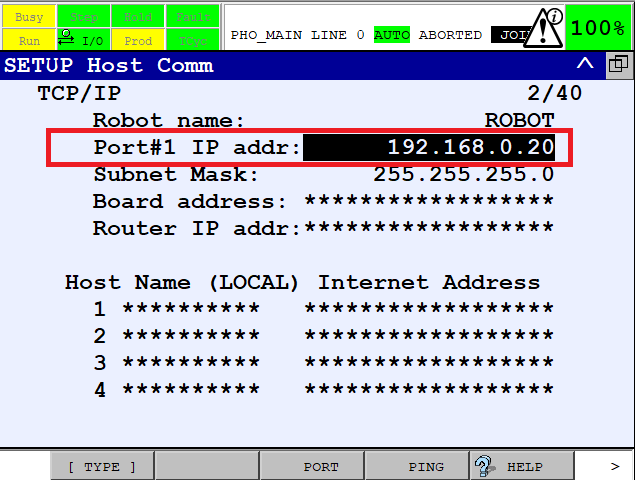
| − | + | Amend the IP address of Port#1 to match your network configuration: | |
| Line 34: | Line 34: | ||
| − | If you use ROBOGUIDE for workcell | + | If you use ROBOGUIDE for workcell commissioning, configure '''Port#2''' for transferring files between the robot controller and your PC. |
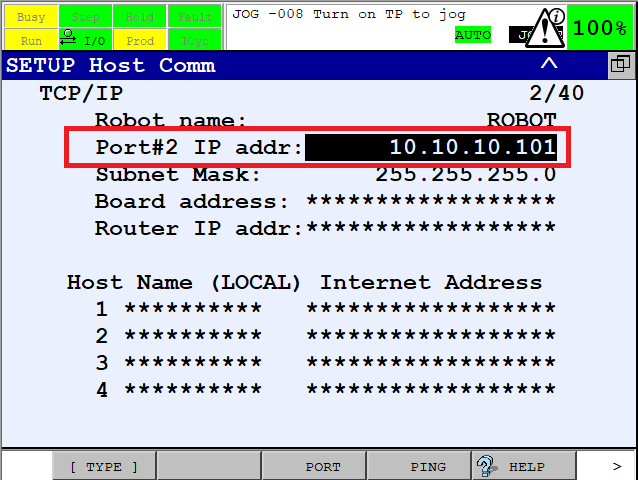
| − | Click '''F3[PORT]''' to switch between Port#1 and Port#2 and | + | Click '''F3[PORT]''' to switch between Port#1 and Port#2 and amend the IP address of Port#2 to match your network configuration: |
| Line 44: | Line 44: | ||
=== 2.2 Configure TCP/IP Server === | === 2.2 Configure TCP/IP Server === | ||
| − | Photoneo Fanuc Module requires State Server to run as a background task on the robot controller. | + | The Photoneo Fanuc Module requires State Server to run as a background task on the robot controller. A configured TCP/IP server is required for this purpose. |
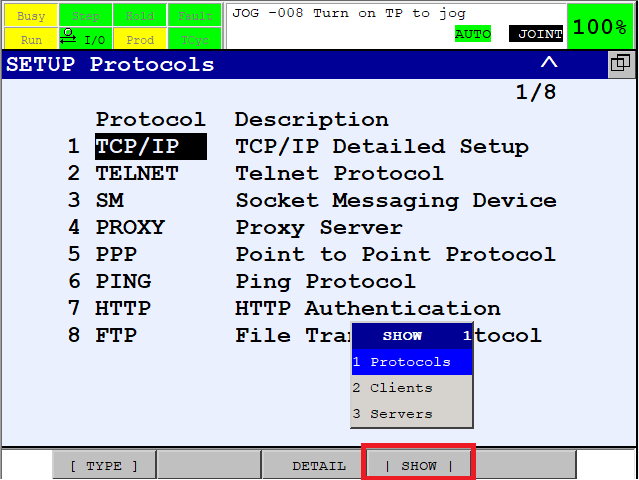
Press '''Menu''' -> '''Setup''' -> '''Host Comm''' -> '''F4[SHOW]''' and select '''Servers''' | Press '''Menu''' -> '''Setup''' -> '''Host Comm''' -> '''F4[SHOW]''' and select '''Servers''' | ||
| Line 52: | Line 52: | ||
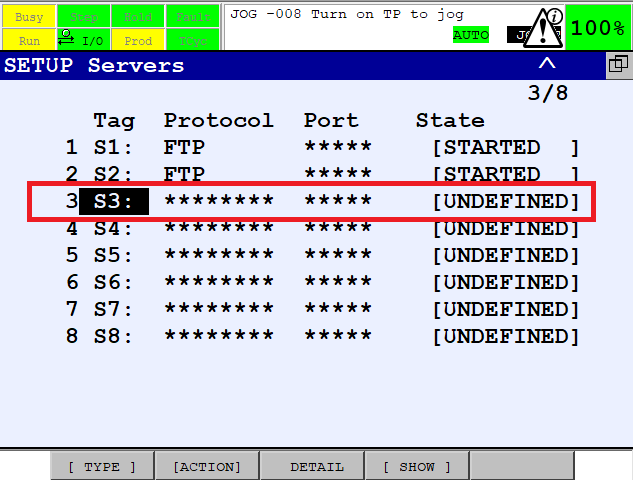
| − | '''Select S3 slot''' - | + | '''Select S3 slot''' - the S1 and S2 slots are reserved for user applications. |
| Line 58: | Line 58: | ||
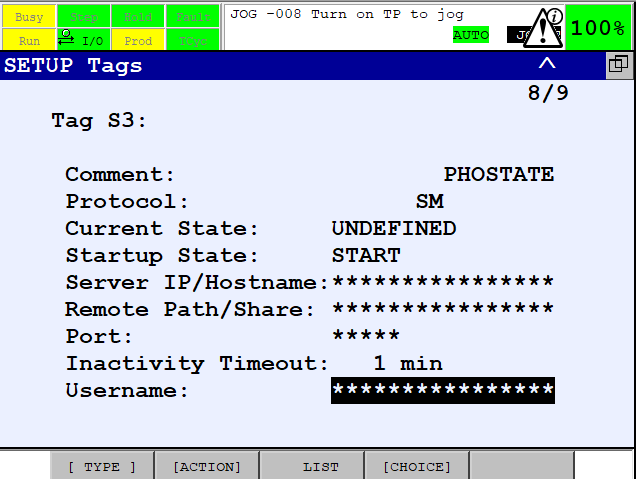
| − | Configure TCP/IP server S3 as shown in the figure below: | + | Configure TCP/IP server S3 as is shown in the figure below: |
| Line 66: | Line 66: | ||
=== 2.3 Configure TCP/IP Client === | === 2.3 Configure TCP/IP Client === | ||
| − | The main Photoneo Bin Picking application works in | + | The main Photoneo Bin Picking application works in client mode. Configure the TCP/IP Client for this purpose. |
Press '''Menu''' -> '''Setup''' -> '''Host Comm''' -> '''F4[SHOW]''' and select '''Clients''' | Press '''Menu''' -> '''Setup''' -> '''Host Comm''' -> '''F4[SHOW]''' and select '''Clients''' | ||
| Line 74: | Line 74: | ||
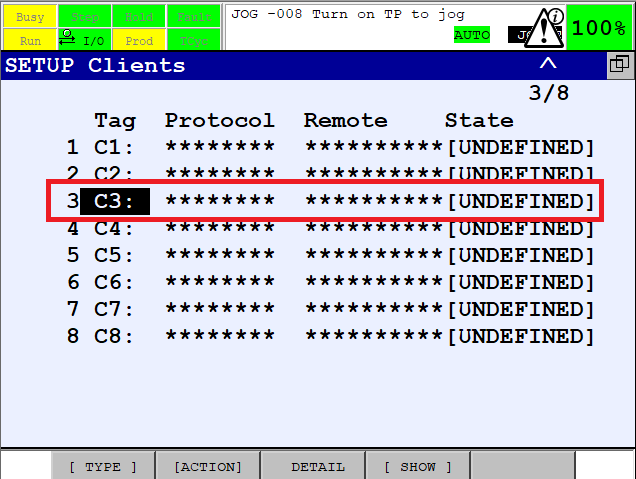
| − | '''Select C3 slot''' - | + | '''Select C3 slot''' - the C1 and C2 slots are reserved for user applications. |
| Line 80: | Line 80: | ||
| − | Configure TCP/IP client C3 as shown in the figure below: | + | Configure the TCP/IP client C3 as is shown in the figure below: |
| − | '''NOTE: Set | + | '''NOTE: Set the IP address of the Vision Controller to SERVER IP/HOSTNAME''' |
| Line 90: | Line 90: | ||
=== 2.4 Change Cartesian Origin of Robot === | === 2.4 Change Cartesian Origin of Robot === | ||
| − | The Cartesian origin of Fanuc robots is different | + | The Cartesian origin of Fanuc robots is different to the Cartesian origin of robot models used in the Photoneo Binpicking Studio. |
| − | In order to ensure successful calibration, | + | In order to ensure successful calibration, it is necessary to apply a predefined offset in the Z axis in UFRAME. |
| − | Press '''Menu''' -> '''Next''' -> '''System''' -> '''Variables''' and scroll down until you find system variable named '''GROUP'''. (Use Shift | + | Press '''Menu''' -> '''Next''' -> '''System''' -> '''Variables''' and scroll down until you find the system variable named '''GROUP'''. (Use Shift to scroll faster) |
| Line 100: | Line 100: | ||
| − | Press '''Enter''' to open '''GROUP''' menu, select '''UPR_T''' and search for '''UFRAME''' option as shown in the figure below: | + | Press '''Enter''' to open the '''GROUP''' menu, select '''UPR_T''' and search for '''UFRAME''' option as is shown in the figure below: |
| Line 112: | Line 112: | ||
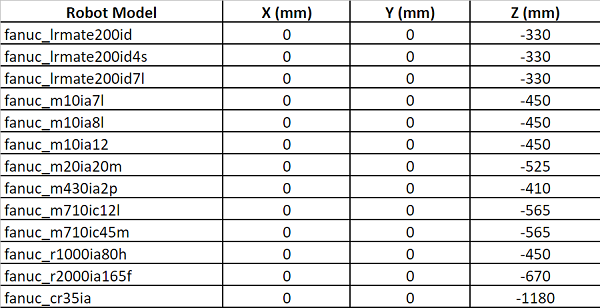
| − | + | Table of Z axis offsets for specific robot models: | |
| Line 118: | Line 118: | ||
| − | '''NOTE: Be careful | + | '''NOTE: Be careful as this change might affect previously taught Cartesian positions !!!''' |
=== 2.5 Load Photoneo Fanuc Module Files === | === 2.5 Load Photoneo Fanuc Module Files === | ||
| − | The Photoneo Fanuc Interface consists of two Karel binaries and approximately 20 TP programs. All these files | + | The Photoneo Fanuc Interface consists of two Karel binaries and approximately 20 TP programs. All of these files need to be copied to the robot controller in order to get Photoneo Fanuc Module up and running. |
| − | Extract Photoneo Fanuc Module archive (.zip file) which you received with Photoneo Bin Picking Studio to the USB stick and plug it | + | Extract the Photoneo Fanuc Module archive (.zip file) which you received with Photoneo Bin Picking Studio to the USB stick and plug it the into Teach Pendant. |
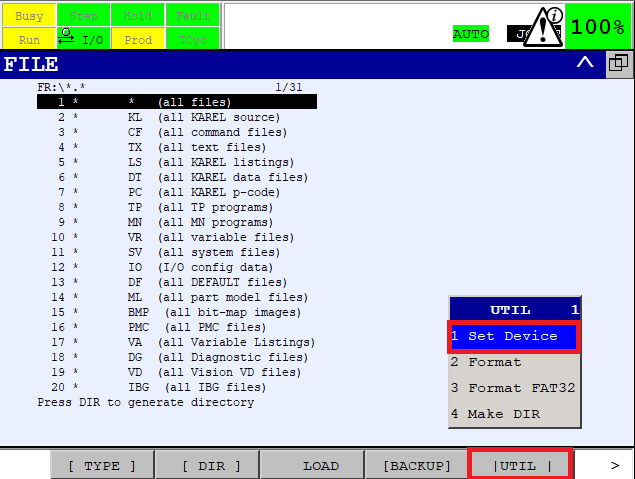
Press '''Menu''' -> '''File''' -> '''File''' -> '''F5[UTILS]''' and select '''Set Device''': | Press '''Menu''' -> '''File''' -> '''File''' -> '''F5[UTILS]''' and select '''Set Device''': | ||
| Line 133: | Line 133: | ||
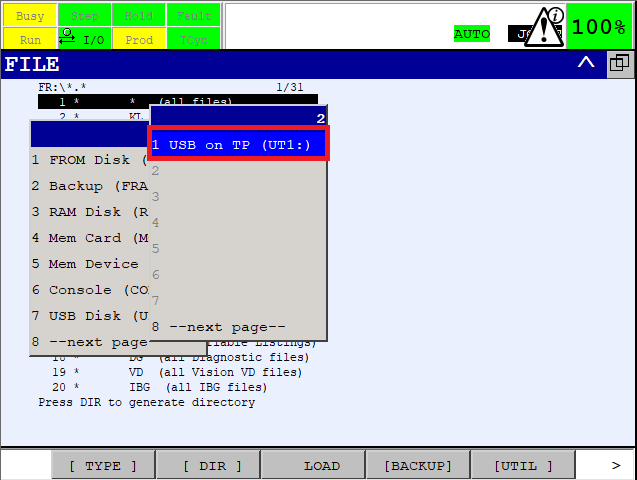
| − | Select '''USB on TP (UT1:)''' option as shown in the figure below: | + | Select '''USB on TP (UT1:)''' option as is shown in the figure below: |
| Line 139: | Line 139: | ||
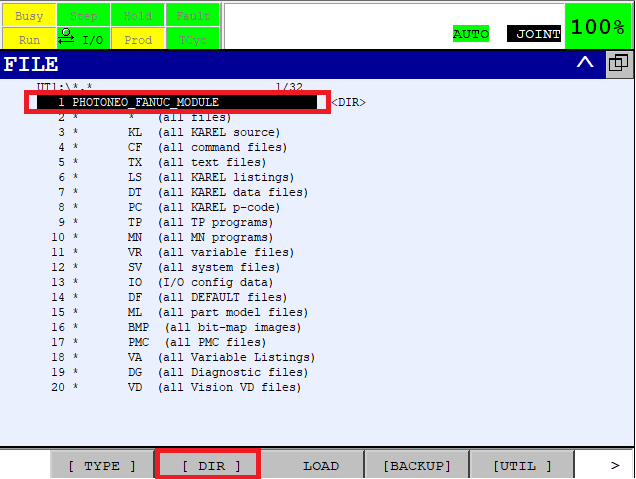
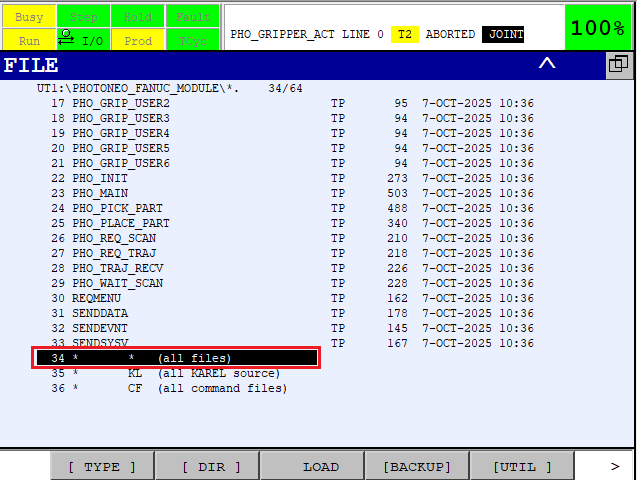
| − | Press '''F2[DIR]''' to set directory subset and select "*.*(all files)" to show all items on USB. | + | Press '''F2[DIR]''' to set the directory subset and select "*.*(all files)" to show all items on the USB. |
| Line 145: | Line 145: | ||
| − | Select '''*.*(all files)''' within '''PHOTONEO_FANUC_MODULE''' and press '''F3[LOAD]''' and '''YES''' to load | + | Select '''*.*(all files)''' within '''PHOTONEO_FANUC_MODULE''' and press '''F3[LOAD]''' and '''YES''' to load the files from the Photoneo Fanuc Module to the robot controller: |
| Line 151: | Line 151: | ||
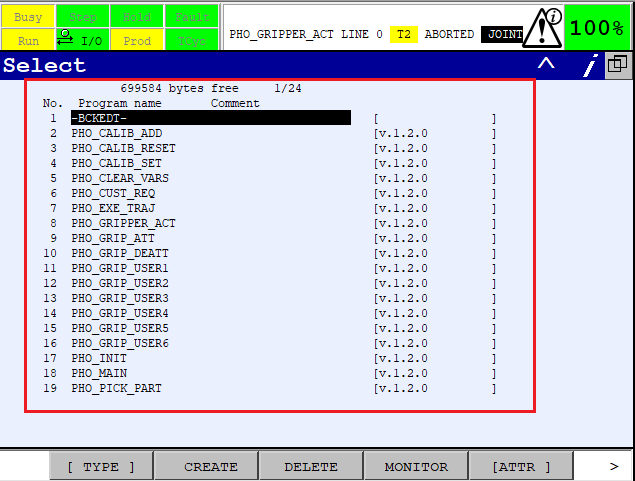
| − | Press '''Select''' button to verify that all TP and Karel programs | + | Press '''Select''' button to verify that all TP and Karel programs have been loaded successfully: |
| Line 159: | Line 159: | ||
=== 2.6 Enable Autostart of State Server === | === 2.6 Enable Autostart of State Server === | ||
| − | + | The next step of the process is to configure State Server to start automatically after boot. | |
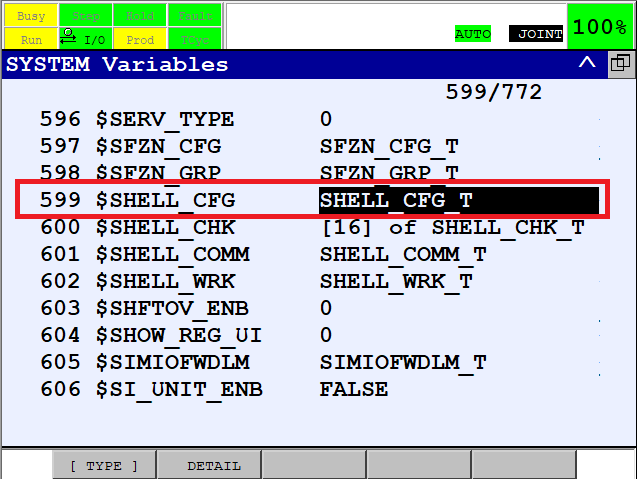
| − | Press '''Menu''' -> '''Next''' -> '''System''' -> '''Variables''' and scroll down to find '''SHELL_CFG''' variable | + | Press '''Menu''' -> '''Next''' -> '''System''' -> '''Variables''' and scroll down to find the '''SHELL_CFG''' variable |
| Line 167: | Line 167: | ||
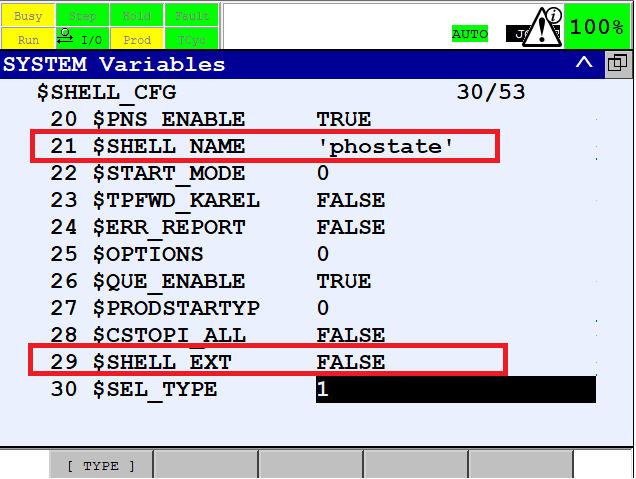
| − | Edit '''SHELL_NAME''' and '''SHELL_EXT''' to the | + | Edit '''SHELL_NAME''' and '''SHELL_EXT''' to match the details shown in the figure below: |
| Line 179: | Line 179: | ||
| − | If everything | + | If everything has been set correctly, you should see '''PHOSTATE: Waiting for connection...''' on the User screen immediately after the boot: |
| Line 187: | Line 187: | ||
=== 2.7 Teach Home, Start and End positions === | === 2.7 Teach Home, Start and End positions === | ||
| − | A crucial step of bin picking configuration is | + | A crucial step of bin picking configuration is the teaching of home, start, and end poses. The home position of the robot should be taught in such a way that the robot remain outside the scanning area. The start position should be taught in such a way that the robot gripper is approximately above the center of the bin. THe end position can be similar to the start position or slightly shifted towards the placing area. Do not position the end pose too far from the bin as this might significantly affect dynamic trajectory planning, increase total planning time and cause planning errors. |
| − | Press '''Data''' to | + | Press '''Data''' to open the '''Data Registers''' screen. As you can see in the figure below, the Photoneo Fanuc Module has automatically added comments to '''Data Registers R[1] - R[24]''' that are utilized for bin picking application. |
| − | '''NOTE: | + | '''NOTE: DO NOT overwrite values stored in registers R[1]-R[24] !!!''' |
Revision as of 08:44, 6 August 2018
1. Prerequisites
Prior to setup please ensure that your Fanuc controller meets the following criteria:
- System version 8.10 and higher (Versions 6.40 - 7.70 are also supported with certain limitations)
- R632 Karel - Karel option available
- R648 User Socket Msg - Socket Communication option available
Click Menu -> Next -> Status -> Version ID -> Next -> F3[ORDER FI] to verify that the required options are installed on your robot controller (see figure below):
2. Fanuc Controller Setup
2.1 Set IP Addresses of Ethernet Ports
The first step of the process is to configure the IP addresses of the robot controller.
Using Teach Pendant, press Menu -> Setup -> Host Comm -> TCP/IP -> F3[Detail]:
Two Ethernet ports should be available; users are recommended to configure Port#1 for communication with Vision Controller.
Amend the IP address of Port#1 to match your network configuration:
If you use ROBOGUIDE for workcell commissioning, configure Port#2 for transferring files between the robot controller and your PC.
Click F3[PORT] to switch between Port#1 and Port#2 and amend the IP address of Port#2 to match your network configuration:
2.2 Configure TCP/IP Server
The Photoneo Fanuc Module requires State Server to run as a background task on the robot controller. A configured TCP/IP server is required for this purpose.
Press Menu -> Setup -> Host Comm -> F4[SHOW] and select Servers
Select S3 slot - the S1 and S2 slots are reserved for user applications.
Configure TCP/IP server S3 as is shown in the figure below:
2.3 Configure TCP/IP Client
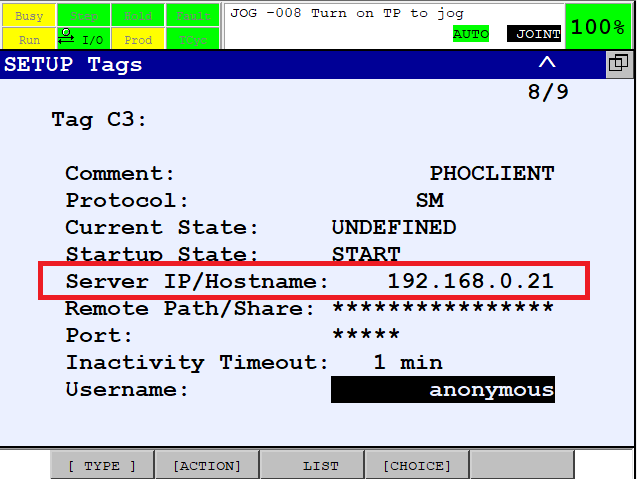
The main Photoneo Bin Picking application works in client mode. Configure the TCP/IP Client for this purpose.
Press Menu -> Setup -> Host Comm -> F4[SHOW] and select Clients
Select C3 slot - the C1 and C2 slots are reserved for user applications.
Configure the TCP/IP client C3 as is shown in the figure below:
NOTE: Set the IP address of the Vision Controller to SERVER IP/HOSTNAME
2.4 Change Cartesian Origin of Robot
The Cartesian origin of Fanuc robots is different to the Cartesian origin of robot models used in the Photoneo Binpicking Studio.
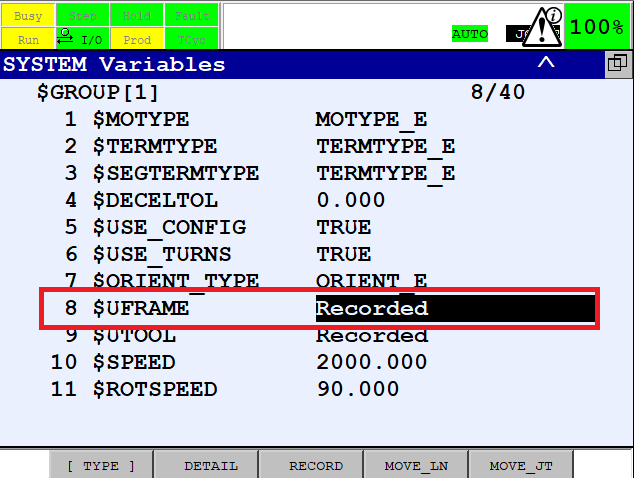
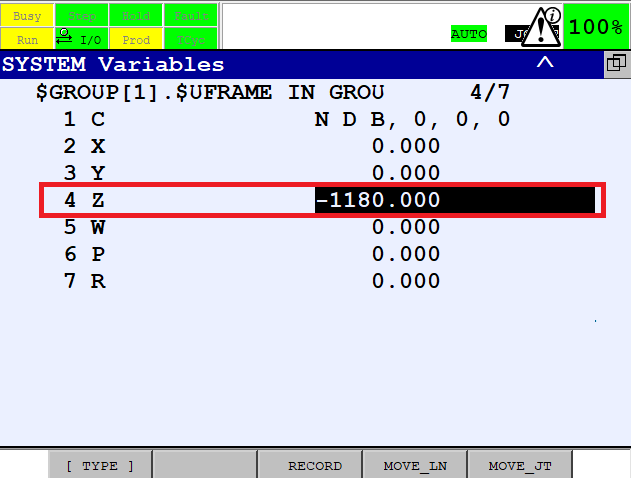
In order to ensure successful calibration, it is necessary to apply a predefined offset in the Z axis in UFRAME.
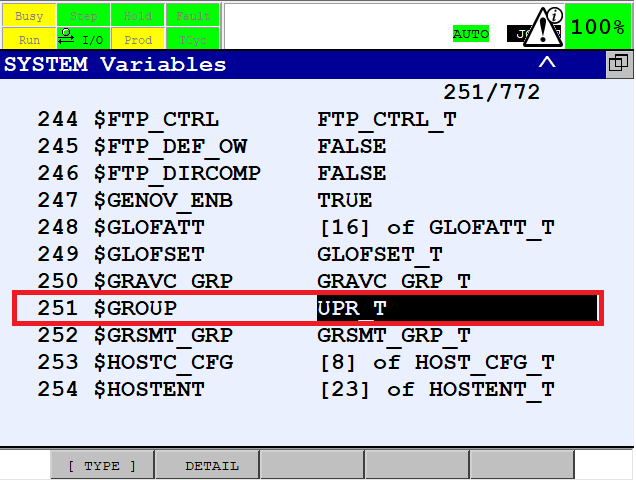
Press Menu -> Next -> System -> Variables and scroll down until you find the system variable named GROUP. (Use Shift to scroll faster)
Press Enter to open the GROUP menu, select UPR_T and search for UFRAME option as is shown in the figure below:
Edit the Z value of UFRAME according to the Offset table below.
Table of Z axis offsets for specific robot models:
NOTE: Be careful as this change might affect previously taught Cartesian positions !!!
2.5 Load Photoneo Fanuc Module Files
The Photoneo Fanuc Interface consists of two Karel binaries and approximately 20 TP programs. All of these files need to be copied to the robot controller in order to get Photoneo Fanuc Module up and running.
Extract the Photoneo Fanuc Module archive (.zip file) which you received with Photoneo Bin Picking Studio to the USB stick and plug it the into Teach Pendant.
Press Menu -> File -> File -> F5[UTILS] and select Set Device:
Select USB on TP (UT1:) option as is shown in the figure below:
Press F2[DIR] to set the directory subset and select "*.*(all files)" to show all items on the USB.
Select *.*(all files) within PHOTONEO_FANUC_MODULE and press F3[LOAD] and YES to load the files from the Photoneo Fanuc Module to the robot controller:
Press Select button to verify that all TP and Karel programs have been loaded successfully:
2.6 Enable Autostart of State Server
The next step of the process is to configure State Server to start automatically after boot.
Press Menu -> Next -> System -> Variables and scroll down to find the SHELL_CFG variable
Edit SHELL_NAME and SHELL_EXT to match the details shown in the figure below:
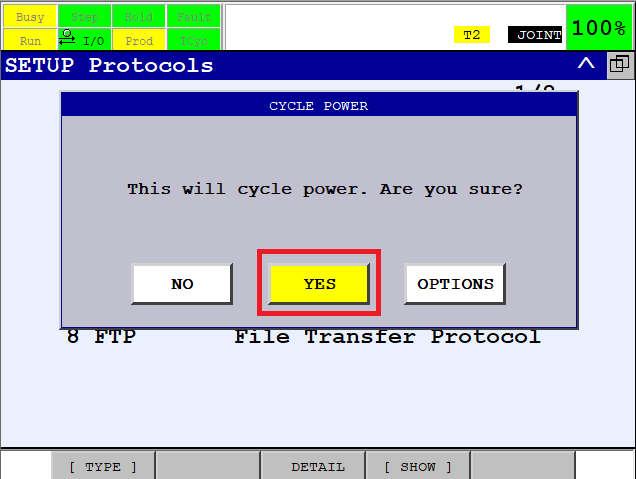
Cycle power to apply all changes. Press FCTN -> NEXT -> CYCLE POWER and confirm YES.
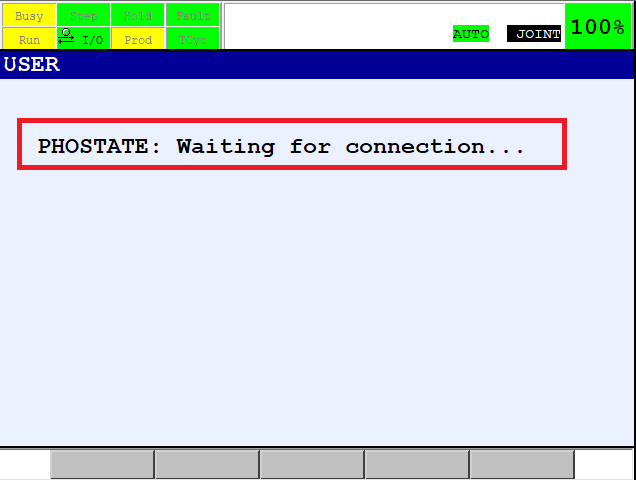
If everything has been set correctly, you should see PHOSTATE: Waiting for connection... on the User screen immediately after the boot:
2.7 Teach Home, Start and End positions
A crucial step of bin picking configuration is the teaching of home, start, and end poses. The home position of the robot should be taught in such a way that the robot remain outside the scanning area. The start position should be taught in such a way that the robot gripper is approximately above the center of the bin. THe end position can be similar to the start position or slightly shifted towards the placing area. Do not position the end pose too far from the bin as this might significantly affect dynamic trajectory planning, increase total planning time and cause planning errors.
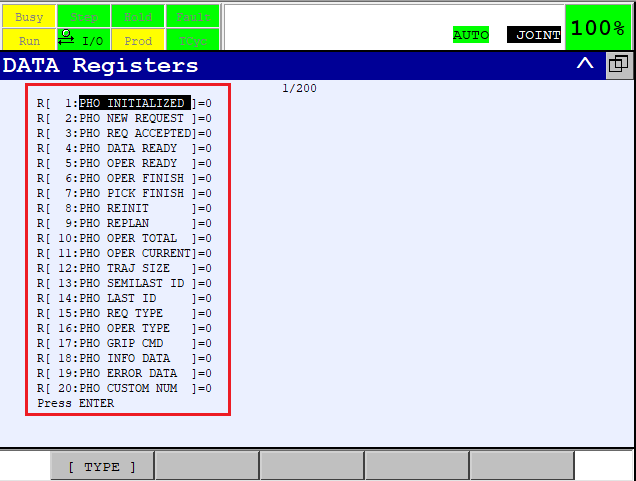
Press Data to open the Data Registers screen. As you can see in the figure below, the Photoneo Fanuc Module has automatically added comments to Data Registers R[1] - R[24] that are utilized for bin picking application.
NOTE: DO NOT overwrite values stored in registers R[1]-R[24] !!!
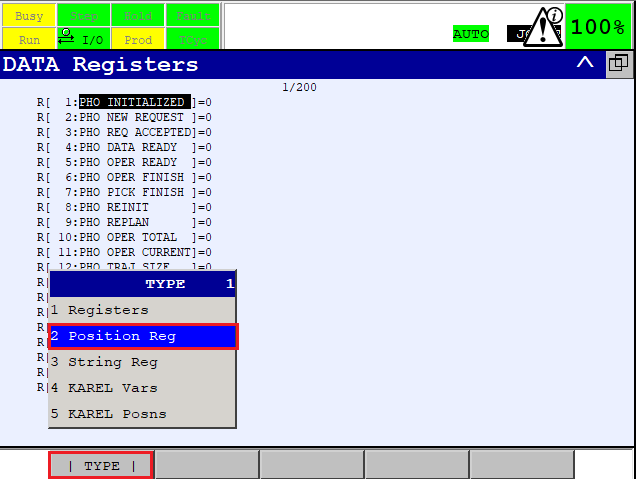
In order to switch from Standard Registers to Position Registers press F1[TYPE] -> Position Registers
NOTE: The default range of position registers is usually PR[1] - PR[100]. For proper functionality of Photoneo Fanuc Module it is highly recommended to increase the range up to 120 position registers or more. Since this is a maintenance operation, please contact your local Fanuc support to help you with this step. Be careful since you might loose your previously taught positions and other register data during this operation!
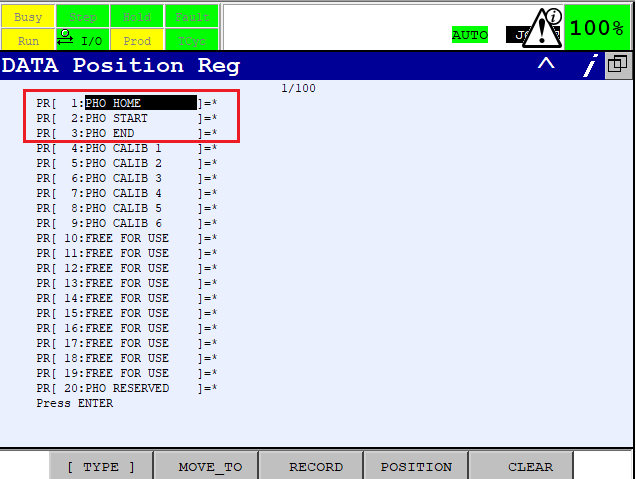
Similarly to Standard Registers, Photoneo Fanuc Module has automatically added comments to Position Registers utilized for bin picking application. As you can see in the figure below - Photoneo Fanuc Module utilize PR[1]-PR[3] for Home, Start, End + PR[4]-PR[9] for calibration positions and PR[20]-PR[120] for trajectory transfers. PR[10]-PR[19] are free for user application.
In order to teach Home position, jog robot to desired pose, select register PR[1] and press Shift + F3[RECORD] to record position.
You should see that asterisk has changed to R sign after successful operation.
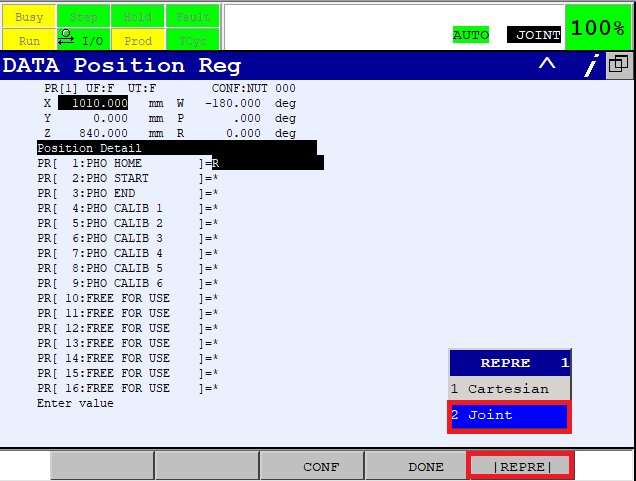
For proper operation of binpicking, internal representation of Home, Start and End needs to be switched from Cartesian to Joint. In order to achieve that press F4[Position] ->F5[REPRE] -> Joint
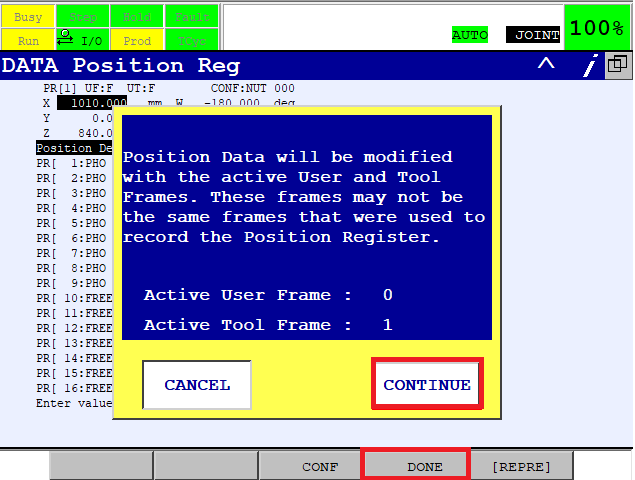
Confirm switching representation by pressing Continue. Repeat the same procedure also for Start and End poses.
NOTE: If you utilize Calibration poses in your application, these don't need to be switched to Joint representation.
At this point your Robot Controller is configured to work with Photoneo Binpicking Studio. However you should adapt the TP code to meet the precise requirements of your application. This may involve updating part placing, gripper commands or application logic. The following section of the tutorial provides some basic examples of how this can be programmed as well as a detailed explanation of the Photoneo TP API.
3. TP LANGUAGE
The Photoneo Fanuc Module was designed to be easily integrated into existing applications written as TP programs.
3.1 TP API
The following list of programs comprises Photoneo Fanuc TP API. These requests are intended for high level control of binpicking sequences and are usually called in PHO_MAIN program.
PHO_REQ_SCAN - request to trigger the next scan and localization. Non-blocking request; the TP program continues immediately at the next line.
PHO_WAIT_SCAN - function to wait for scan to be finished. This should be called after triggering the scan, but not doesn't have to be called immediately. Blocking function, waits for response from Vision Controller.
PHO_TRAJ_REQ - request to start trajectory planning for current goal. Non-blocking function; the TP program continues immediately at the next line.
PHO_TRAJ_RECV - function to receive requested bin picking trajectories (consisting of a sequence of trajectory and gripper operations). Blocking function; waits for motion data to be received.
PHO_INIT - request to initialize bin picking application from the Vision Controller side. Start and End Poses defined by the operator from Teach Pendant are transferred to the Vision Controller and used in the trajectory planning pipeline as start and terminus points.
PHO_CALIB_ADD - request to add calibration point - a scan is triggered and the calibration is recalculated. Blocking request; the program will not continue until the calibration result is recalculated and has been received by the Robot Controller.
PHO_CALIB_SET - request to set current calibration result to the PhoXi Scanner
PHO_CALIB_RESET - request to reset current calibration and remove all previously added points
3.2 TP CONFIG
Following programs enable the user to configure several bin picking settings, to implement gripper commands and to adapt placing of the attached object.
PHO_GRIP_ATT - implement function for attaching object to gripper here
PHO_GRIP_DEATT - implement function for deattaching object from gripper here
PHO_GRIP_USER1 - implement function for custom gripper command (reserved for future use)
PHO_GRIP_USER2 - implement function for custom gripper command (reserved for future use)
PHO_GRIP_USER3 - implement function for custom gripper command (reserved for future use)
PHO_GRIP_USER4 - implement function for custom gripper command (reserved for future use)
PHO_GRIP_USER5 - implement function for custom gripper command (reserved for future use)
PHO_GRIP_USER6 - implement function for custom gripper command (reserved for future use)
PHO_PICK_PART - standard bin picking sequence. This flexible, operation-based implementation allows performing bin picking sequences, which consist of various numbers of operations.
PHO_PICK_PART - implement function for placing attached object
3.3 TP ERROR HANDLING
The Photoneo FANUC interface provides basic error handling. If an error occurs during bin picking operations, an error code is returned in Register R[19] - PHO ERROR DATA.
Following is the list of potential binpicking error codes:
OK = 0 - Service response from Vision Controller is valid
SERVICE_ERR = 1 - Service response from Vision Controller is invalid.
UNKNOWN_REQ = 2 - The Vision Controller received an unknown request.
COMM_FAILURE = 3 - Communication failure due to socket closure.
BAD_DATA = 4 - Data validation check has failed.
TIMEOUT = 5 - Communication failure due to socket timeout.
PLANNING_FAILED = 201 - Trajectory planning has failed
NO_PART_FOUND = 202 - No part has been localized
NOT_INIT = 203 - Binpicking application has not been properly initialized on Vision Controller
UNKNOWN_ERR = 299 - Unspecified internal error
Photoneo Fanuc Interface by default performs basic error handling right after TRAJ_RECV program call.
If NOT_INIT or SERVICE_ERR occurs, the whole bin picking is reinitialized.
If PLANNING_FAILED or NO_PART_FOUND occurs, scanning is repeated.
It is up to user to decide if existing error handling is sufficient for particular application or it needs to be expanded.
3.4 MAIN APPLICATION
PHO_MAIN program can be considered as a basic bin picking template. The main program loop with basic error handling is implemented here. Adapt to meet your application requirements.
  1:  !Start Phoclient
  2:  RUN PHOCLIENT
  3:  !Initialize Binpicking
  4:  LBL[1]
  5:  CALL PHO_INIT
  6:  !Clear REINIT flag
  7:  F[8]=(OFF)
  8:  WAIT   1.00(sec)
  9:  LBL[2]
 10:  !Move to Home Position
 11:J PR[1] 100% FINE
 12:  !Request First Scan
 13:  CALL PHO_REQ_SCAN
 14:  !Clear REPLAN flag
 15:  F[9]=(OFF)
 16:  !Main Loop
 17:  LBL[3]
 18:  !Wait For Scan
 19:  CALL PHO_WAIT_SCAN
 20:  !Request Trajectory
 21:  CALL PHO_REQ_TRAJ
 22:  !Receive Trajectory
 23:  CALL PHO_TRAJ_RECV
 24:  !Check Reinit Flag
 25:  IF (F[8]=ON),JMP LBL[1]
 26:  !Check Replan Flag
 27:  IF (F[9]=ON),JMP LBL[2]
 28:  !Pick Part
 29:  CALL PHO_PICK_PART
 30:  !Request Next Scan
 31:  CALL PHO_REQ_SCAN
 32:  !Place Part To Defined Spot
 33:  CALL PHO_PLACE_PART
 34:  JMP LBL[3]
 /POS
 /END
4. Runtime
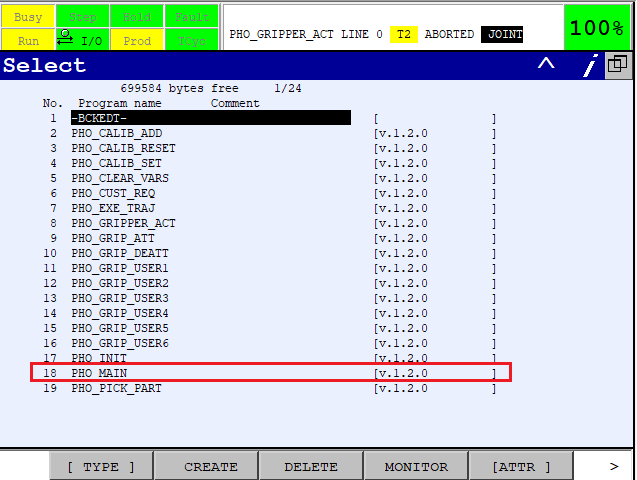
Now you are ready to start the bin picking application. Press Select button and choose PHO_MAIN program:
Make sure that the Bin Picking application on the Vision Controller side is running and waiting for a connection:
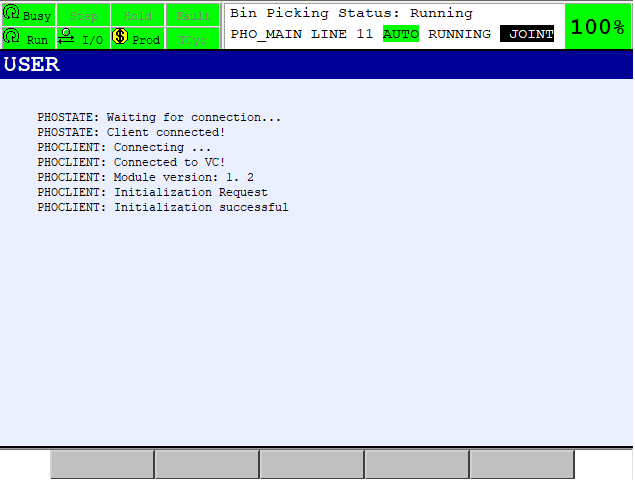
Start the PHO_MAIN program in Manual or Auto mode and if everything was configured properly you should see that PHOCLIENT has established connection with Vision Controller:
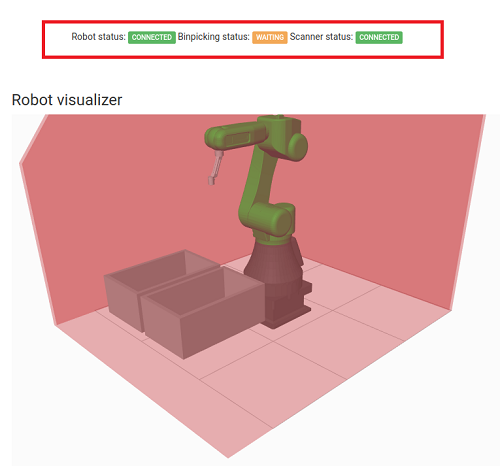
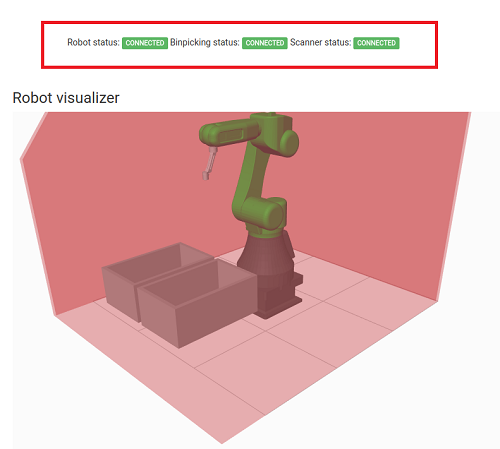
If the connection between the robot controller and the vision controller has been established properly, the robot should move to the Home position and the Bin picking status should show: Connected
As soon as the trajectory to the first localized object is calculated, the robot should start executing motion.
NOTE: Ensure that you are ready to halt motion execution immediately. It is strongly recommended to reduce the speed to 10% of maximum during initial bin picking tests.
